<?xml version="1.0" encoding="utf-8"?><feed xmlns="http://www.w3.org/2005/Atom" xml:lang="en"><generator uri="https://jekyllrb.com/" version="4.4.1">Jekyll</generator><link href="https://sumin1ee.github.io/feed.xml" rel="self" type="application/atom+xml" /><link href="https://sumin1ee.github.io/" rel="alternate" type="text/html" hreflang="en" /><updated>2026-05-12T21:58:43+09:00</updated><id>https://sumin1ee.github.io/feed.xml</id><title type="html">Sumin Lee</title><subtitle>Open research notebook of Sumin Lee — MS researcher at the Intelligent Robotics &amp; Computer Vision Lab, Hanyang University. Notes on Gaussian Splatting, online mapping, and end-to-end driving.</subtitle><author><name>Sumin Lee</name><email>maroona@hanyang.ac.kr</email></author><entry><title type="html">U-Net — Convolutional Networks for Biomedical Image Segmentation</title><link href="https://sumin1ee.github.io/posts/unet-paper-review/" rel="alternate" type="text/html" title="U-Net — Convolutional Networks for Biomedical Image Segmentation" /><published>2024-05-16T19:00:00+09:00</published><updated>2024-05-16T19:00:00+09:00</updated><id>https://sumin1ee.github.io/posts/unet-paper-review</id><content type="html" xml:base="https://sumin1ee.github.io/posts/unet-paper-review/"><![CDATA[<p>해당 글은 CV 공부를 이제 막 시작한 컴비린이가 작성한 글임을 미리 밝힙니다! 
각 사진의 출처는 하이퍼링크로 달아두었습니다 :)</p>

<p>This post is written by the beginner who just started studying Computer Vision 
and i indicated references of each figure by leaving web links :)</p>

<p><em>+++ 드디어!!!! 약 5개월 만의 여정 끝에 첫 게시물을 올린다. 그동안 너무 바빠서 블로그 올릴 틈이 전혀 없었는데, 정리를 하지 않고 닥치는대로 공부하다 보니 머리에 남는게 아무 것도 없는 것 같았다.  그나마 바쁜 게 조금 덜 해진 것도 있고 하니… 앞으로는 잘 정리해서 지속적으로 포스팅 할 계획이다 ( 가끔은 개인적인 일상이나 회고록도 올릴 예정이니 많관부 :rocket: )</em></p>

<p><br /><br /></p>

<blockquote>
  <p><strong>U-Net: Convolutional Networks for Biomedical Image Segmentation</strong></p>
</blockquote>

<blockquote>
  <blockquote>
    <p><strong>Authors : Olaf Ronneberger, Philipp Fischer, and Thomas Brox</strong></p>
  </blockquote>
</blockquote>

<blockquote>
  <blockquote>
    <p><strong>Citation : About 84000 (as of 2024-05-13)</strong></p>
  </blockquote>
</blockquote>

<blockquote>
  <blockquote>
    <p><strong>Paper Link : https://link.springer.com/chapter/10.1007/978-3-319-24574-4_28</strong></p>
  </blockquote>
</blockquote>

<p><br /><br /></p>

<h2 id="introduction--related-work"><strong>Introduction &amp; Related work</strong></h2>
<hr />
<h3 id="what-is-semantic-segmentation"><strong>What is Semantic Segmentation?</strong></h3>
<hr />
<h4 id="classification---localization---object-detection---image-segmentation"><strong>Classification -&gt; Localization -&gt; Object Detection -&gt; Image Segmentation</strong></h4>

<p>BIomedical Image Processing 뿐만이 아니라 CV 자체에 큰 임팩트를 남긴 이 논문은 Image Segmentation, 그 중에서도 Semantic Segmentation에 연관되어 있다.</p>

<p>그렇다면 Semantic Segmentation이란 무엇을 의미할까?</p>

<p>해당 논문이 투고될 2015년 당시엔 CNN의 SOTA모델이 해결할 수 있는 task는 <strong>Classification</strong> 이었다. Classification은 한 이미지가 input으로 들어가서, 단순하게 사전에 라벨링 해놓은 특정 Class로 분류되는 과정을 말한다.  즉 이미지 하나당 Output은 Labeled Class 하나이다.</p>

<p>( + CNN의 초기 모델 AlexNet의 Fully Connected Layer 특성을 생각해본다면 쉽게 유추할 수 있다)</p>

<p>여기서 한 걸음 더 나아가, Labeling 된 Class가 이미지 중에 어디에 있는지 찾는 Task가 바로 <strong>Localization</strong>이다. 주로 BBox(Bounding Box)를 찾는데, 즉 Input은 이미지이고, Output은 BBox (주로 center point의 x와 y, 그리고 bbox의 height와 width로 주어진다)로 표현된다.</p>

<p>Localization은 이미지 속에서 <strong>하나의</strong> Target Single-Class 에 대해서만 찾는다. 이에 반해 사전에 Labeling한 <strong>모든 객체</strong>를 이미지속에서 찾고 각각 Localization을 진행하는게 <strong>Object Detection</strong>이다.</p>

<p>이 과정을 거쳐 최종적으로 발전한 단계가 바로 <strong>Image Segmentation</strong>이라고 할 수 있는데, 픽셀별로 Classification &amp; Localization을 진행해서 특정 객체가 정확히 이미지 속에서 어디 있는지 찾는 Task이다.</p>

<p>아래의 그림을 보면 더 쉽게 이해할 수 있다
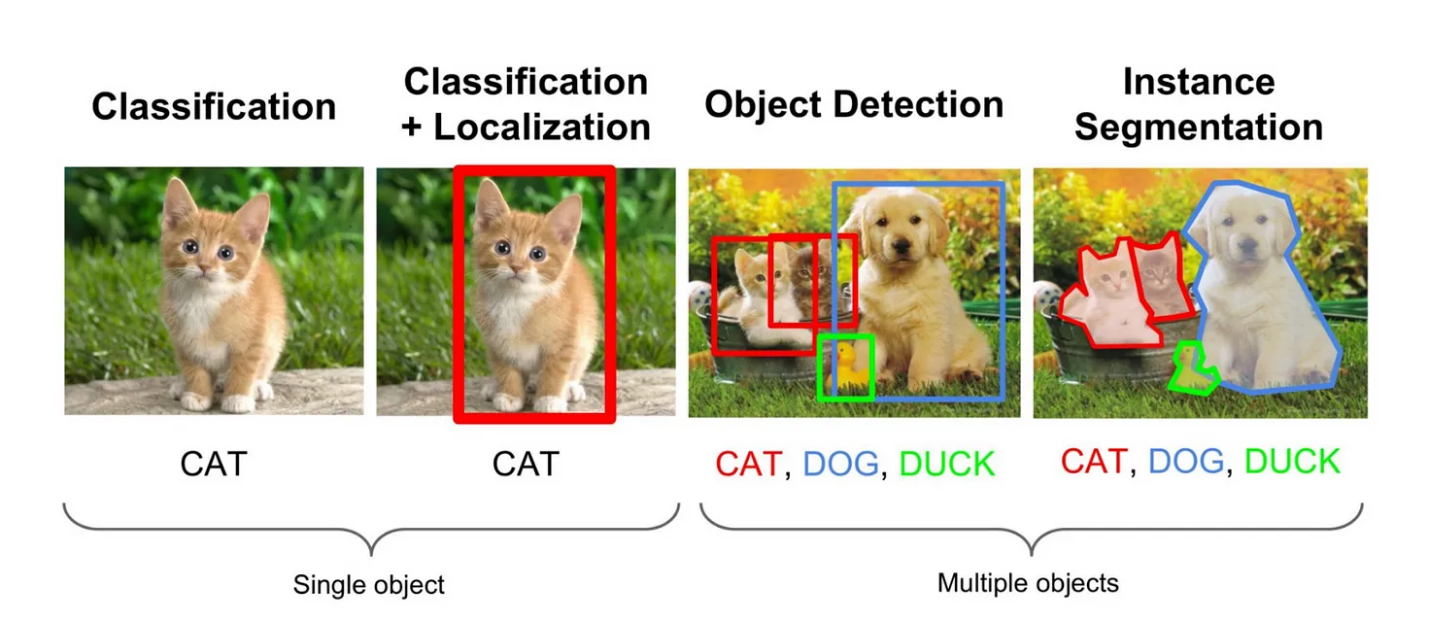
</p>

<p><img src="/images/Screenshot from 2024-05-14 15-55-23.png" alt="Screenshot from 2024-05-14 15-55-23" /></p>

<div style="text-align: center;"> 
     <a href="https://medium.com/comet-app/review-of-deep-learning-algorithms-for-object-detection-c1f3d437b852" style="color: inherit; text-decoration: none;">
         <b>Fig 1. Examples of Classfication, Localization, Object Detection and Segmentation</b></a> <br />
</div>
<hr />

<h4 id="image-segmentation"><strong>Image Segmentation</strong></h4>
<p>Image Segmentation은 크게 세 가지로 분류할 수 있다.</p>

<ol>
  <li><strong>Semantic Segmentation</strong> - 각 픽셀을 Class로 분류한다. 하지만 각각의 Instance를 구분하진 못한다. ( e.g. Car와 Person은 구분하지만 Person1 과 Person2를 구분하진 못함)</li>
  <li><strong>Instance Segmentation</strong> - 각 픽셀을 Class로 분류하는 것이 아닌 Instance로 분류. 따라서 instance들이 어떤 Class에 속하는 지를 알 수 없다.</li>
  <li><strong>Panoptic Segmentation</strong> - Semantic Segmentation + Instance Segmentation, 픽셀별로 어떤 Class와 Instance에 속하는지 모두 알 수 있다.</li>
</ol>

<p><img src="/images/Screenshot from 2024-05-14 21-19-52.png" alt="Screenshot from 2024-05-14 21-19-52" /></p>

<div style="text-align: center;"> 
     <a href="https://www.labellerr.com/blog/semantic-vs-instance-vs-panoptic-which-image-segmentation-technique-to-choose/" style="color: inherit; text-decoration: none;">
         <b>Fig 2. Examples of Semantic Segmentation, Instance Segmentation and Panoptic Segmentation</b></a> <br />
</div>

<p><br /></p>

<p>
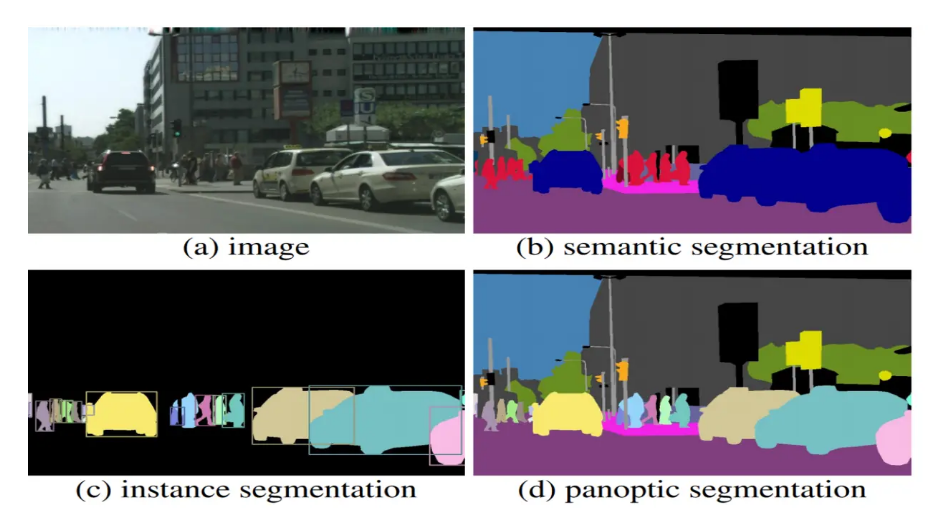
오늘 다룰 논문의 U-Net은 이 중에서도 Semantic Segmentation을 Task로 갖는다.</p>

<hr />

<h3 id="fc-layer-vs-fcn-in-image-segmentation"><strong>FC Layer vs FCN in Image Segmentation</strong></h3>

<hr />

<h4 id="drawbacks-of-the-fc-layer"><strong>Drawbacks of the FC Layer</strong></h4>

<p>Vanila CNN Architecture를 보면 FC Layer(Fully Connected Layer)가 존재한다. 이 Layer는 Classfication을 위해 존재하는데, 이름대로 어떤 레이어의 뉴런이 다음 레이어의 모든 뉴런과 연결된 구조이다. 때문에 해당 Layer에서의 Parameter는 엄청나게 많아질 수 밖에 없는데, 이는 <strong>Regularization 성능을 매우 떨어뜨릴 수 있고 학습 속도를 저하</strong>시킨다.</p>

<p><img src="/images/Screenshot from 2024-05-14 22-05-24.png" alt="Screenshot from 2024-05-14 22-05-24" /></p>

<div style="text-align: center;">
     <a href="https://www.boostcourse.org/ai111/lecture/1156340?isDesc=false" style="color: inherit; text-decoration: none;">
         <b>Fig 3. The Number of Parameters in AlexNet</b></a> <br />
</div>
<p><br />
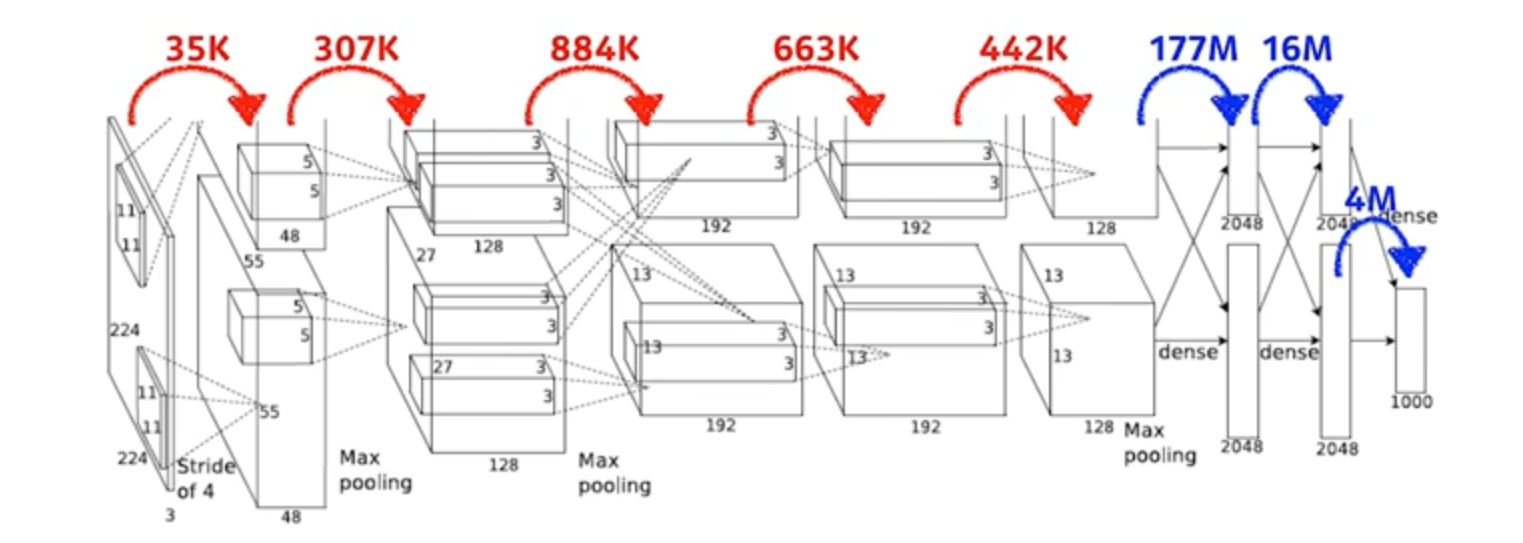
K(10^3) 단위의 Parameter 수가 FC Layer를 거치는 순간 M(10^6) 단위로 바뀌는 것을 확인할 수 있다.</p>

<p>또한 FC Layer의 최종 Output 채널의 차원은 Labeled Class의 개수로 유도되므로, FC Layer를 거치는 순간 공간 정보가 모두 유실된다. 이는 곧 FC Layer로는 Semantic Segmentation에서 제일 중요한 <strong>Localization</strong>을 할 수 없다는 말이 된다.</p>

<p>마지막으로 FC Layer의 Parameter 수는 항상 고정이기 때문에 (앞서 말한 Labeled Class 의 개수가 고정) Input Feature Map의 크기도 강제되며, 이에 따라 <strong>Input Image 크기 역시 고정</strong>된다.</p>

<hr />

<h4 id="fcnfully-convolutional-network"><strong>FCN(Fully Convolutional Network)</strong></h4>

<p>기존 CNN의 구조에서 Image Segmentation을 위해 발전한 구조로, 앞서 말한 Image Segmentation 관점에서의 FC Layer의 단점을 보완하기 위해 고안되었다.</p>

<p>
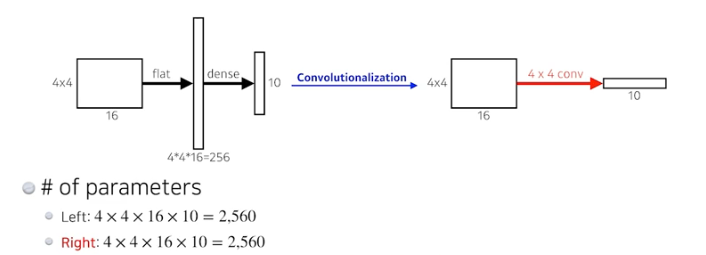
간단하게 말해서 CNN예 존재하는 FC Layer의 구조를 모두 Convolution Layer로 대체한 구조이다. 이 대체 과정을 <strong>Convolutionalization</strong>이라 한다.</p>

<p><img src="/images/Screenshot from 2024-05-14 22-43-06.png" alt="Screenshot from 2024-05-14 22-43-06" /></p>

<div style="text-align: center;">
     <a href="https://www.boostcourse.org/ai111/lecture/1156342?isDesc=false" style="color: inherit; text-decoration: none;">
         <b>Fig 4. The Example of Convolutionalization </b></a> <br />
</div>
<p><br />
(FCN에 관한 자세한 내용은 따로 찾아보는 것을 추천)</p>

<p>그럼 FCN의 어떤 부분이 Image Segmentation의 관점에서 FC Layer 보다 더 뛰어날까?</p>

<p>이는 Convolutional Layer와 Dense Layer(FC Layer)의 특성 차이를 보면 곧 알 수 있는데, Convolutional Layer는 각 채널의 Filter SIze만큼의 Locality를 유지하기 때문에 공간 정보가 유지된다.</p>

<p>또한 Image Segmentation의 task 자체가 한 픽셀마다 Classification을 하는 것이다 보니, 주변 픽셀들과의 관계를 중점적으로 보는 것이 중요하다. 여기서 Dense Layer는 모든 픽셀을 전부 고려하는 반면, Convolutional Layer는 주변 픽셀들과의 관계를 학습하기 때문에 Image Segmentation에 더욱 더 적합하다.</p>

<p>+++ 사실 생각해보면 당연하다. 우리가 Semantic Segmentation을 통해 얻고자 하는 Output은 Pixel-Classified Image라고 볼 수 있는데, Dense Layer의 경우에는 Classification 하나의 값만 나온다.</p>

<hr />

<h3 id="data-augmentation"><strong>Data Augmentation</strong></h3>

<p>
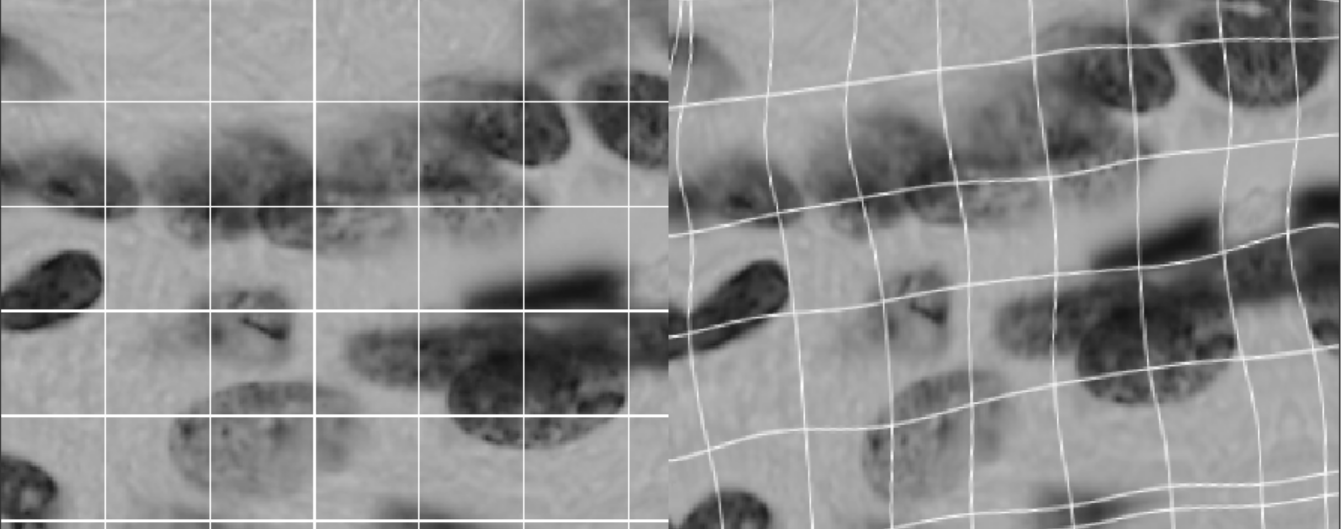
저자는 매우 적은 Training Data를 이용했고, 그럼에도 성능이 잘 나온다고 말했다  이 이유로 Excessive Data Augmentation 을 이용했기 때문이라 밝혔는데, 이 때 Data Augmentation의 기법으로 Elastic Deformation을 사용했다고 한다.</p>

<p><img src="/images/Screenshot from 2024-05-16 15-04-37.png" alt="Screenshot from 2024-05-16 15-04-37" /></p>

<div style="text-align: center;">
     <a href="https://www.kaggle.com/code/ori226/data-augmentation-with-elastic-deformations" style="color: inherit; text-decoration: none;">
         <b>Fig 5. The Example of Elastic Deformation on Image </b></a> <br />
</div>

<hr />

<h2 id="network-architecture"><strong>Network Architecture</strong></h2>

<hr />

<h3 id="u-shaped-network"><strong>U-Shaped Network</strong></h3>

<p><img src="/images/Screenshot from 2024-05-16 15-39-23.png" alt="Screenshot from 2024-05-16 15-39-23" /></p>

<div style="text-align: center;">
     <a href="https://link.springer.com/chapter/10.1007/978-3-319-24574-4_28" style="color: inherit; text-decoration: none;">
         <b>Fig 6. U-net Architecture </b></a> <br />
</div>
<p><br />
보이는 것처럼 Network가 U자 형태를 띠고 있어서 U-Net이라고 명명이 되었다.</p>

<p>가장 먼저 Input으로 (572,572)의 Image가 들어가게 되고, Downsampling 과정을 거치다가 Upsampling 되어 (388,388) 의 Segmentation map으로 Output이 나간다.</p>

<p>이 때 Downsampling 부분을 <strong>Contracting Path</strong>, Upsampling 부분을 <strong>Expanding Path</strong> 라고 한다.</p>

<hr />

<h4 id="contracting-path"><strong>Contracting Path</strong></h4>

<p>일반적인 CNN 과정과 동일하게 Unpadded Convolution을 2번씩 진행하며, 따라서 feature map이 (x,y) 각각 2씩 줄어드는 것을 볼 수 있다. 또한 Stride가 2인 max-pooling을 사용하여 feature map의 크기 자체를 반으로 줄인다. 이 때 pooling의 특성상 정보가 손실될 수 있는데, 이를 방지하기 위해 채널 수를 두 배로 늘려준다.</p>

<hr />

<h4 id="expansive-path"><strong>Expansive Path</strong></h4>

<p>Expansive Path는 (3, 3) convolution을 두 번씩, up-convolution 이라고 불리는 과정을 한 번씩, 그리고 이 과정을 반복하며 진행된다.</p>

<p>여기서 feature map의 크기를 복원하는 방법이 조금 특이한데, up-convolution이 되고 나서, 같은 단계에 있는 Contracting Path의 feature map을 crop해서 up-conv가 진행된 feature map에 concat시킨다. 여기서 crop을 하는 이유는 반대편에 있는 Contracting Path의 feature map의 H,W와 up-conv feature map의 H,W가 서로 일치하지 않기 때문이다.</p>

<hr />
<h2 id="training"><strong>Training</strong></h2>
<hr />
<h3 id="optimizer--hyperparameter"><strong>Optimizer &amp; Hyperparameter</strong></h3>

<ul>
  <li>Optimizer : Stochastic Gradient Descent (SGD)</li>
  <li>Hyperparameter : Large Batch Size,        Momentum = 0.99</li>
</ul>

<hr />

<h3 id="energy-function"><strong>Energy Function</strong></h3>

<p>픽셀별로 Classification 을 진행할 때 Softmax를 사용했으며, 이에 따라 Energy Function은 Probabilistic Loss인 Cross Entropy로 정의된다.
\(E = \sum_{\mathbf{x} \in \Omega} w(\mathbf{x}) \log(p_{\ell(\mathbf{x})}(\mathbf{x}))\)</p>

<hr />

<h2 id="conclusion"><strong>Conclusion</strong></h2>

<p><img src="/images/Screenshot from 2024-05-16 19-13-40.png" alt="Screenshot from 2024-05-16 19-13-40" /></p>

<div style="text-align: center;">
     <a href="https://link.springer.com/chapter/10.1007/978-3-319-24574-4_28" style="color: inherit; text-decoration: none;">
         <b>Fig 7. Cell segmentation by using the model of U-Net </b></a> <br />
</div>
<p><br />
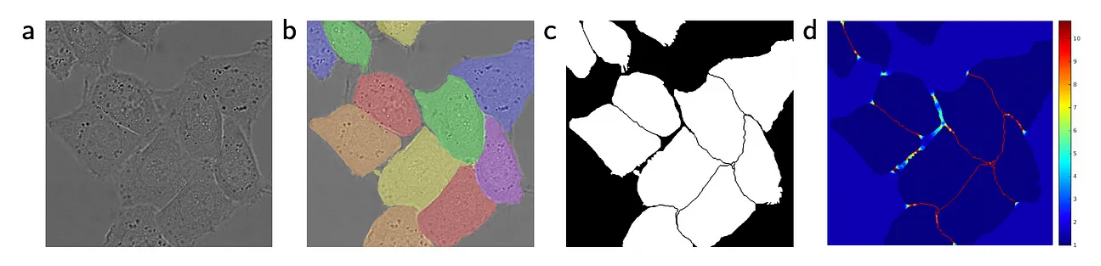
당시 Cell Segmentation 에서 가장 큰 어려움은 Cell들이 겹쳐있을 때 잘 분간하지 못한다는 점이었다. 이 부분에서 U-Net은 해당 시점의 SOTA 모델보다 더욱 잘 Segmentation을 수행했다.</p>

<p>저자는 마지막으로 이러한 말을 하였다.</p>

<blockquote>
  <p>We are sure that the u-net architecture can be applied easily to many more tasks</p>
</blockquote>

<p>
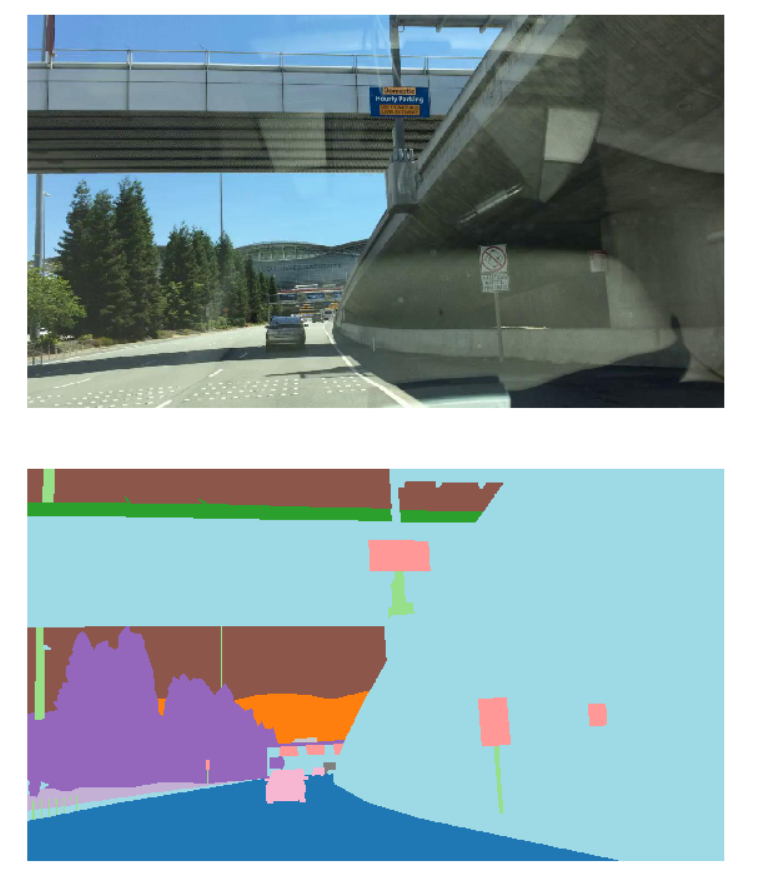
이 포스트를 작성할 시점의 2024년에 와서는, U-net은 Self-Driving Cars 분야에서도 매우 큰 영향을 미쳤다.</p>

<p>그의 말이 사실이 된 것이다.</p>

<p>Autonomous Driving에서 Semantic Segmentation은 Drivable Region과 다양한 Object들을 찾는데 중요한 역할을 한다.</p>

<p><img src="/images/Screenshot from 2024-05-16 20-20-28.png" alt="Screenshot from 2024-05-16 20-20-28" /></p>

<div style="text-align: center;">
     <a href="https://wandb.ai/wandb_fc/articles/reports/Semantic-Segmentation-for-Self-Driving-Cars--Vmlldzo1NDY5ODE5" style="color: inherit; text-decoration: none;">
         <b>Fig 8. Implementation of Semantic Segmentation in Self-Driving Car</b></a> <br />
</div>]]></content><author><name>Sumin Lee</name><email>maroona@hanyang.ac.kr</email></author><category term="Paper Review" /><category term="unet" /><category term="semantic-segmentation" /><category term="computer-vision" /><category term="perception" /><summary type="html"><![CDATA[해당 글은 CV 공부를 이제 막 시작한 컴비린이가 작성한 글임을 미리 밝힙니다! 각 사진의 출처는 하이퍼링크로 달아두었습니다 :)]]></summary></entry></feed>